You have a fantastic image, a perfect idea for your next embroidery project. It looks crisp on your screen, but when you try to stitch it on your Brother machine, the result is disappointing—puckered fabric, blurry edges, and colors that do not look right. This common frustration stems from a simple misunderstanding: an embroidery machine does not see pictures. To achieve that clean, professional finish you envision, you must learn to translate your visual idea into a language your machine understands. This is the essential process to convert JPG to PES for Embroidery.
It is Not Just a File Change: Pixels vs. Stitches
The first step toward clean stitching is understanding what you are actually doing. A JPG file is a raster image, a grid of tiny colored squares called pixels. It is perfect for viewing on a screen. A PES file, however, is not a picture at all. It is a detailed set of sewing instructions, a blueprint written specifically for your Brother machine.
This blueprint contains commands for every needle movement, stitch type, thread color change, and trim function. Converting an image to a PES file is the process of digitizing—translating a flat, visual graphic into a structured, three-dimensional sewing plan. Thinking of it as a translation, not a conversion, sets the stage for accuracy.
Preparing Your Image: The Foundation of Clean Results
Your success hinges on the image you start with. Not every picture is suitable for embroidery. The best candidates are images with high contrast, bold outlines, and simple shapes. A complex photograph with subtle shadows and gradients will be nearly impossible to translate into clean stitches.
Before you even open your digitizing software, prepare your image in a basic photo editor. Increase the contrast dramatically to make key elements stand out. Crop out busy backgrounds. Convert the image to black and white to see if the core shapes are still strong and recognizable. Removing tiny details that are smaller than an embroidery needle will save you from fuzzy, unreadable areas in the final stitch-out. A simplified, graphic version of your image is the perfect roadmap for clean digitizing.
Choosing Your Digitizing Path: Service, Software, or Shortcut?
You have a few main routes to create your PES file, each with a different balance of quality, cost, and effort.
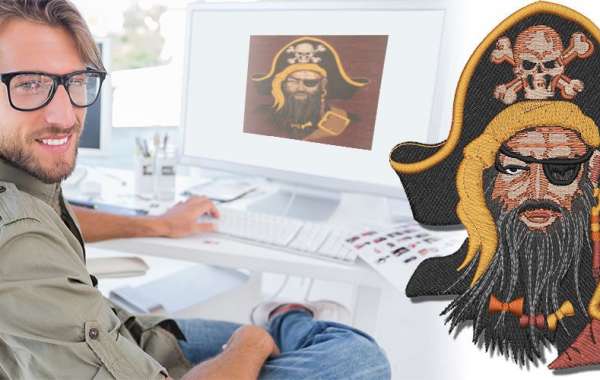
For the cleanest, most accurate results—especially for business logos or important projects—using a professional digitizing service is the best choice. You upload your prepared JPG, and an expert manually creates the PES file. They engineer the underlay, stitch types, and density for your specific fabric. You pay for skill and receive a guaranteed, production-ready file.
If you want to learn the craft, dedicated digitizing software like Hatch or Wilcom is your tool. This path gives you complete control to manually trace and assign stitches. The learning curve is significant, but the creative freedom is total. It is ideal for hobbyists who want to master the process.
Avoid fully automated online converters promising instant PES files. These tools create chaotic stitch paths, ignore underlay, and make poor design choices, leading directly to the puckered, messy results you are trying to avoid.
The Core of Clean Digitizing: Key Steps in the Process
Whether you are doing it yourself or evaluating a service, knowing what makes a clean PES file will help you. True digitizing is a layered construction process.
It starts with the underlay, the hidden foundation. This layer of stitching stabilizes the fabric and prevents the puckering that ruins accuracy. A proper PES file will include a edge run or zigzag underlay tailored to the design.
Next is intelligent stitch assignment. Clean designs use satin stitches for glossy text and borders, and fill stitches for larger areas. The digitizer plans the stitch direction and sewing sequence to minimize jumps, creating an efficient file that runs smoothly and keeps the back tidy. Finally, they calibrate the stitch density and pull compensation. Correct density ensures the design is not too stiff or too loose, while pull compensation accounts for thread tension to prevent gaps between colors.
The Non-Negotiable Step: The Test Stitch-Out
Your PES file is not finished when you save it on your computer. It is only a theory. The proof is in the stitching. You must always run a test on a scrap of your project fabric with the correct stabilizer.
This test is your quality control. Watch the machine run. Does the fabric lie flat? Do the details look sharp? Afterward, examine the sample closely. Any puckering or registration errors provide critical feedback. You then return to the digitizing software to make micro-adjustments—a slight density change here, a tweak to the underlay there. This cycle of testing and refining is the only way to achieve consistent, accurate results.
Converting an image to a clean and accurate PES file is a disciplined process of translation and engineering. It begins with preparing a strong, simple image and choosing a reliable digitizing method. It is perfected by understanding the critical roles of underlay, stitch assignment, and density, and is validated by the essential practice of the test stitch-out. By respecting this process, you move beyond hoping for a good result to engineering one. This ensures that every project you stitch is a crisp, professional reflection of your original vision, turning a simple JPG into a masterpiece of thread.